Intro to Salesforce Admin
Based on Trailhead
Categories: CRM Software
Tags: Salesforce SaaS
This article teaches all about basic Salesforce Admin stuff.
The Basics
Intro
Salesforce is a CRM (Customer Relation Management) software made to improve business sales, customer service, and marketing automation. It helped pioneer SaaS and uses an Oracle-powered relational database to help gather, create, delete, and analyze corporate data. Recall that SaaS is a software-first cloud delivery model (unlike IaaS where admins need to control the server's inner works like the operating system).
Note: This article is based on this trailhead course.
For Salesforce Admins, there are many things to take note of:
- It's not just a database that holds client data, you can also use it to automate marketing tasks (Marketing Cloud Engagement).
- Apex is the server-side language that Salesforce runs on. It is a variant of the Java language used by advanced admins.
- The database relies on a dialect of SQL called SOQL (Salesforce Object Query Language) designed for Salesforce.
- If you want to customize the frontend of your corporate web page apps, you can use Lightning Web Components (LWC) to customize the layout to your liking.
- The client-side runs on ECMAScript 7 while the server-side runs on Apex
Note: VisualForce is an older framework for building UI components. LWC can offer all of VisualForce's functionality with new and upgraded features.
Furthermore, depending on your business model, you can have each department meet their specific needs. For example, for the finance department, you can customize its dashboard to display budget/contract management and pricing.
For the sales executives:

Ok, now we get on the juicy stuff. We'll start creating our own Salesforce sandbox to experiment and commit changes for testing purposes.
To create a sandbox for the course (or you just want to make sure if it is there), go to Salesforce Trailhead and create an account. From there, create/launch your org in "Hands-on Org". You can find it by clicking on your profile then you can create one from there.
There are some important terms to remember:

- App: A set of objects, fields and other functionality to support a business process. You can find them by clicking on the App Launcher icon beside the word "Dreamhouse".
- Object: SQL Table in Salesforce-speak
- Record: SQL rows in Salesforce-speak
- Field: SQL columns in Salesforce-speak
- Org (Not highlighted in the picture): It is the implementation of a Salesforce instance. You're in an org in order to use Salesforce.
Note: A Salesforce instance is also called Point of Delivery (POD). It is a container in a running server that holds everything that Salesforce is required to run i.e. application server, database server, search and file system, and the database itself (read here for more info).
Custom Objects, Fields, and Relationships
Creating a Custom Object and Field
Custom objects in Salesforce are data that we need to track. Examples include "Invoices", "Job Postings", "Accounts", "Opportunities" etc. They are all nouns and need to broad as much as possible.
In this example, we can add "Job Posting" as an object:
- In our default Homepage, Click on the gear icon called "Setup", then click "setup"
- Under "Quick Find", type "Object Manager". Click on it.
- Click "Create" beside "Schema Builder". Then click "Custom Object".
- For this example, we type in the Label "Job Posting". This will be the name for our custom object.
- Click on "Allow Search". We enable this for testing purposes.
- It is important not to ignore clicking on "Launch New Custom Tab Wizard after saving this custom object.". If you ignored this after creating the object, you will have to create the tab manually. Otherwise, it wouldn't be accessible from the client:
- Type "Tabs" in the Quick Find box in the Setup menu.
- Select Tabs under the User Interface section.
- Look for the Custom Object Tabs section and click New.
- Select "Job Posting" from the Object dropdown menu.
- Choose a Tab Style (the icon that will represent your object).
- Click Next, choose which profiles should see the tab, and click Save.
- Everything else can be left as default.

For terminal enjoyers, here's a link. This can help you make changes to your org directly from your terminal.
Now go back to the sandbox. When you are about to add a new "Job Posting" custom object. This is what it should look like:
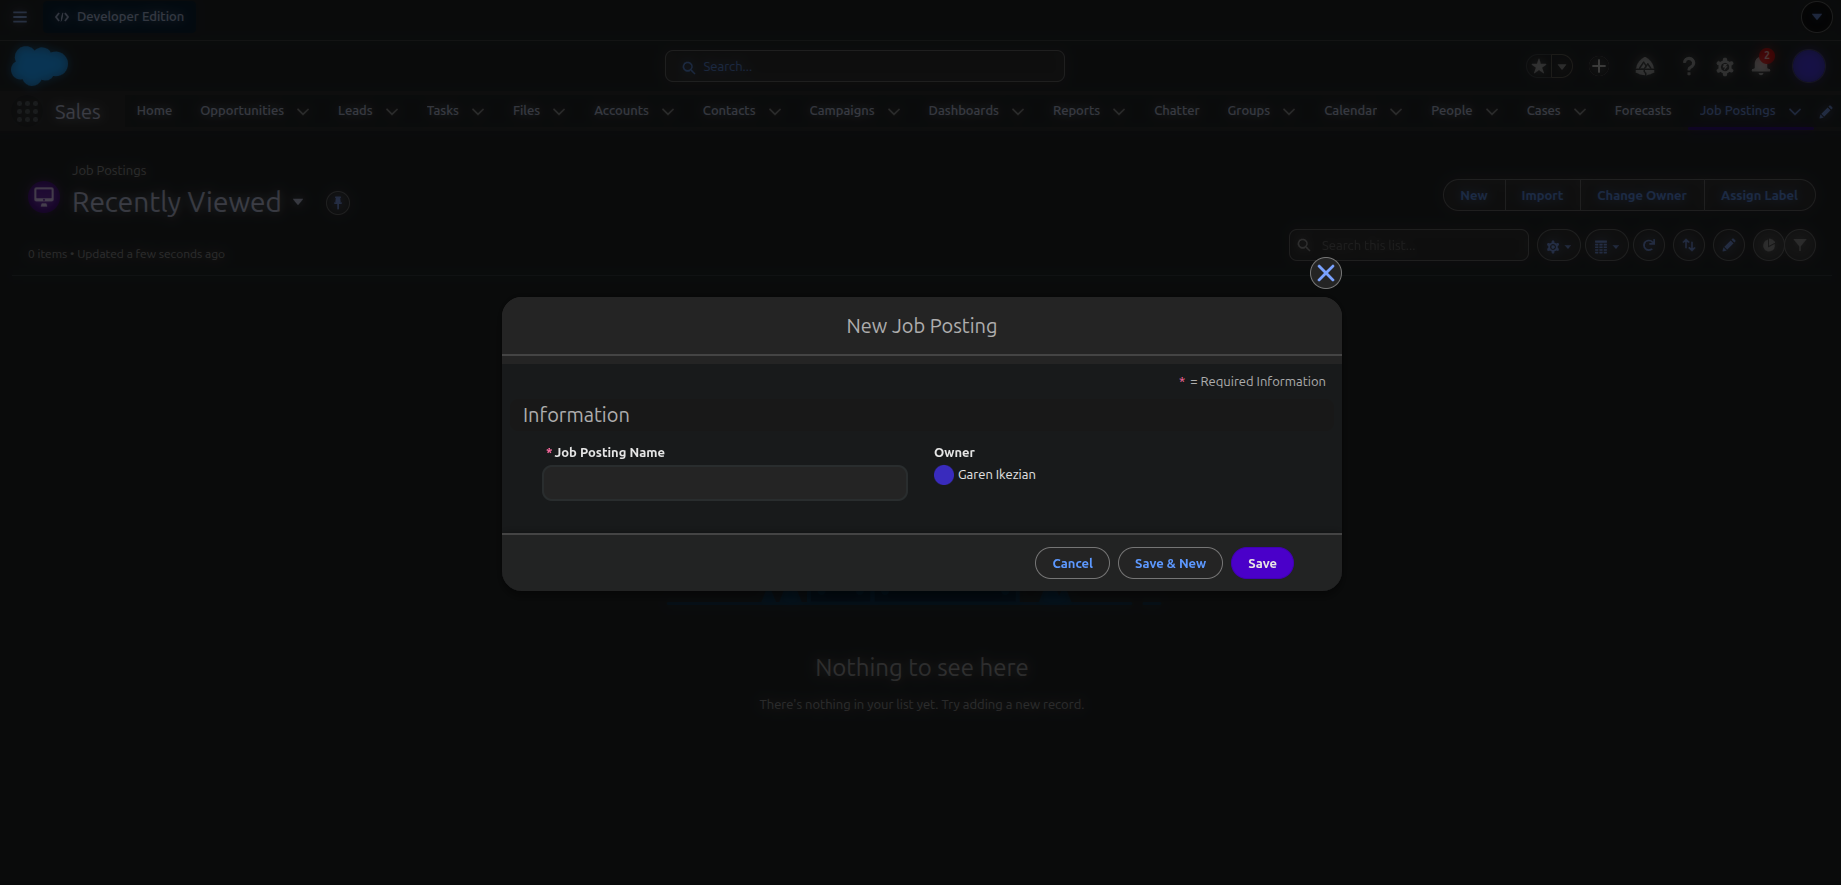
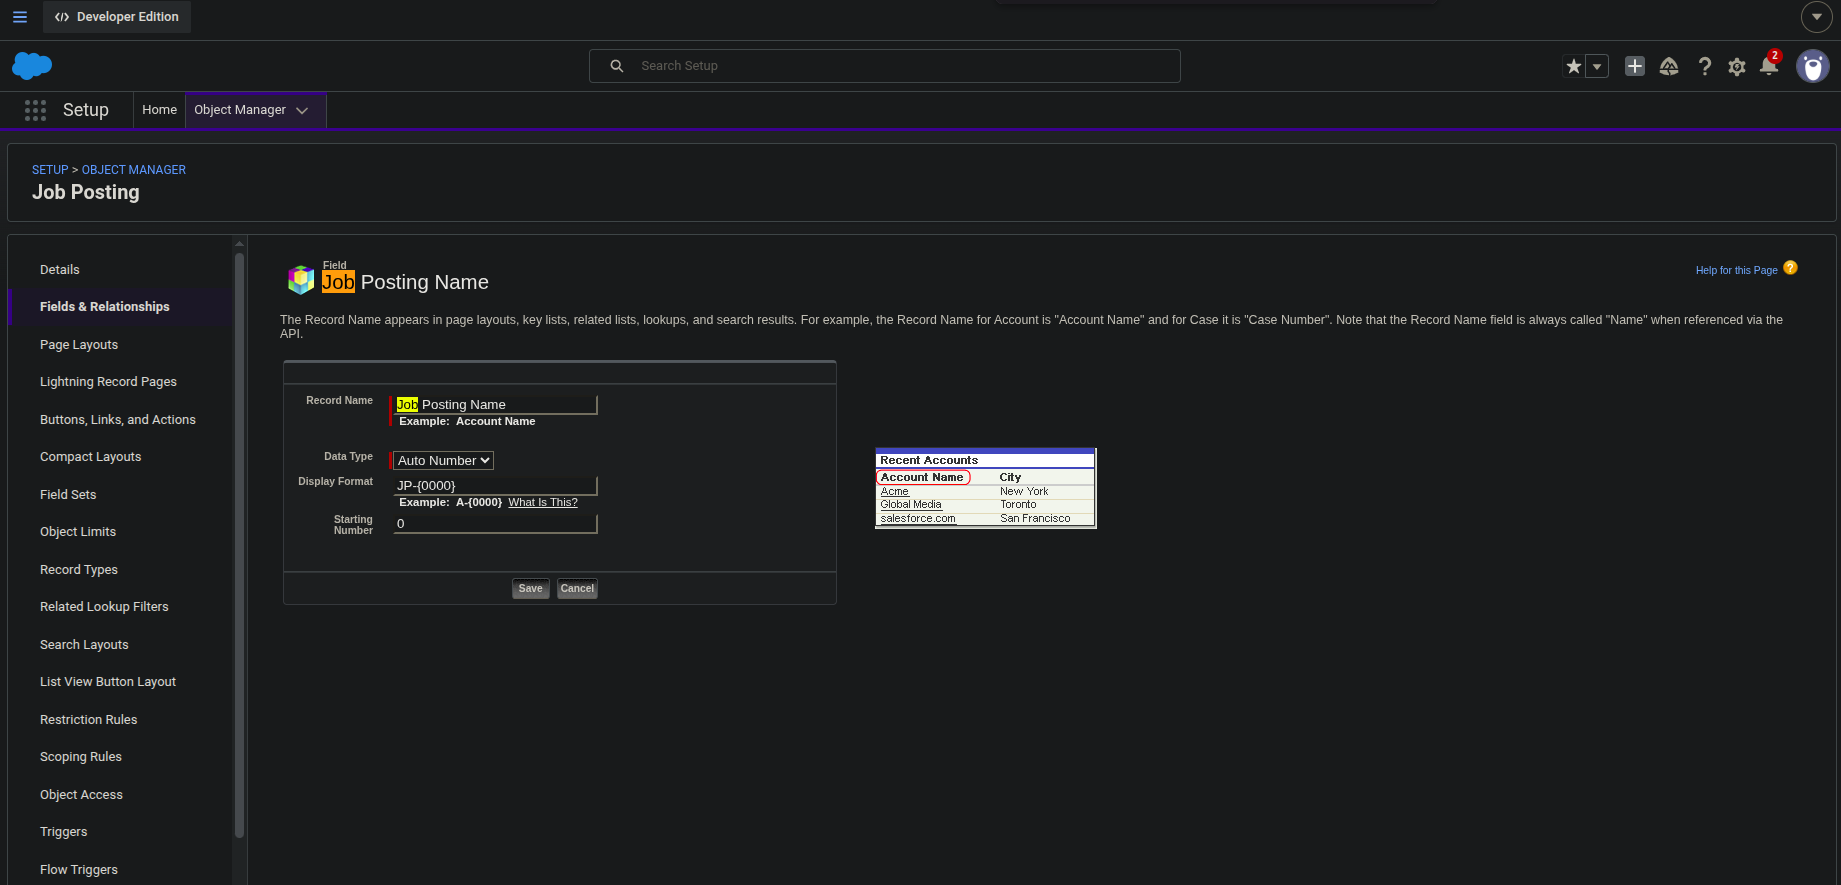
The "Job Posting Name" comes from the "Enter Record Name Label and Format" during the creation process. This needs to be treated like a high-level unique field to ease search results.
We can go back to our custom object we've created, click on "Fields & Relationships", click the record "Job Posting Name", then proceed changing the values like so:
Alright! Now we'll add a field in our object.
- Go back to Object Manager in Setup if you're not there.
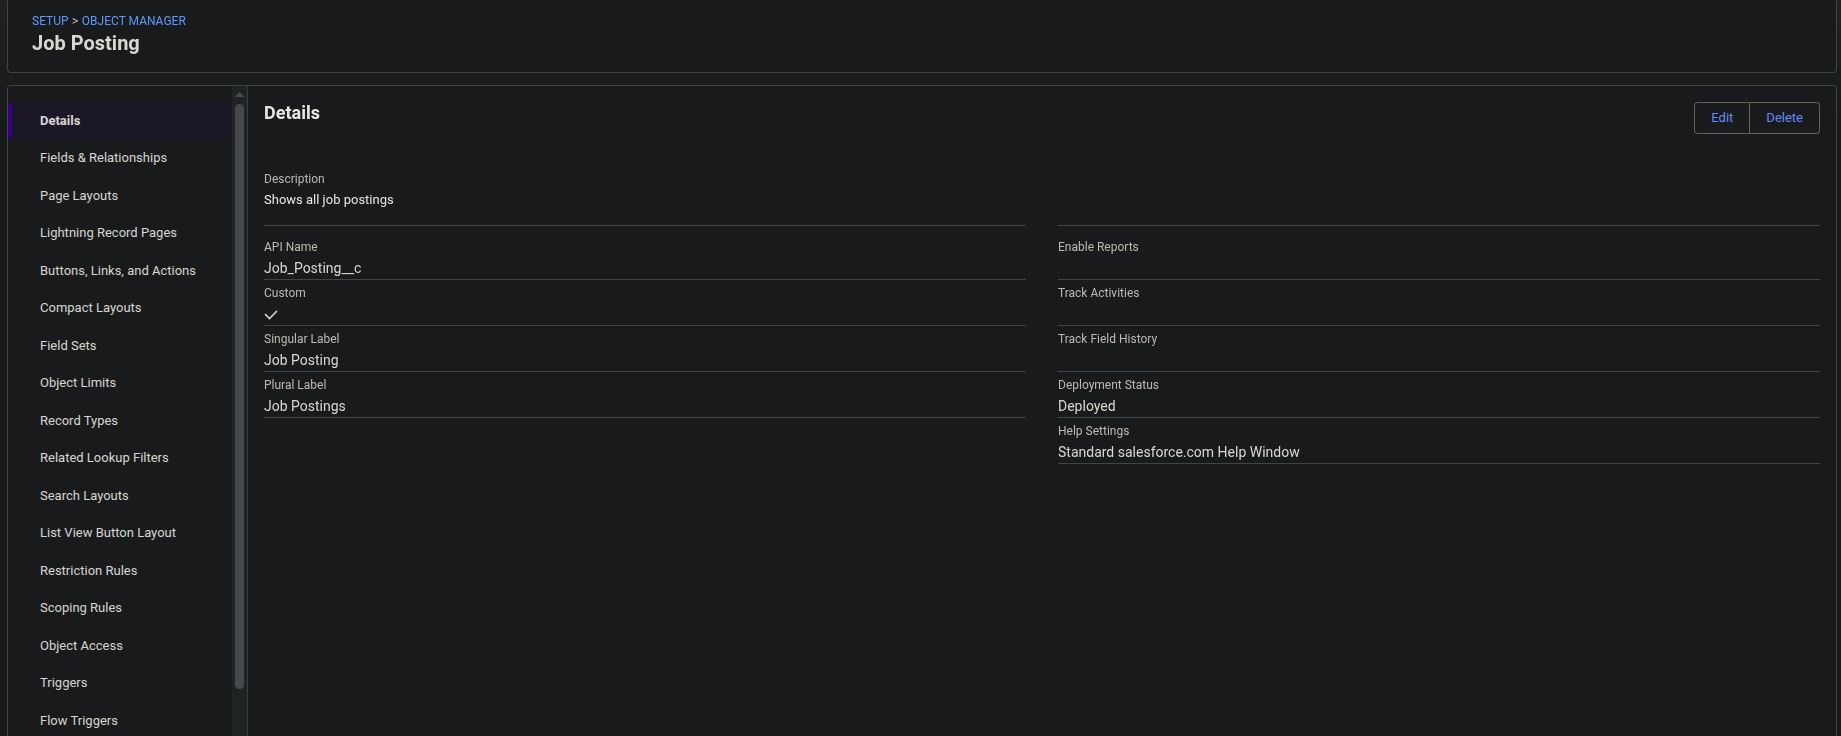
- Find the custom object you've just created "Job Posting". Make sure its API name ends with "__c" (so "Job_Posting__c"). Double underscore c helps Salesforce identify custom metadata with all its methods and properties pre-set.
- You should now see this:
- Click on "Fields and Relationships"
- Click "New"
- You'll find several data types. For now, we can click on "Text Area" ("Text" requires you to specify the legnth while "Text Area" has the max length to 255).
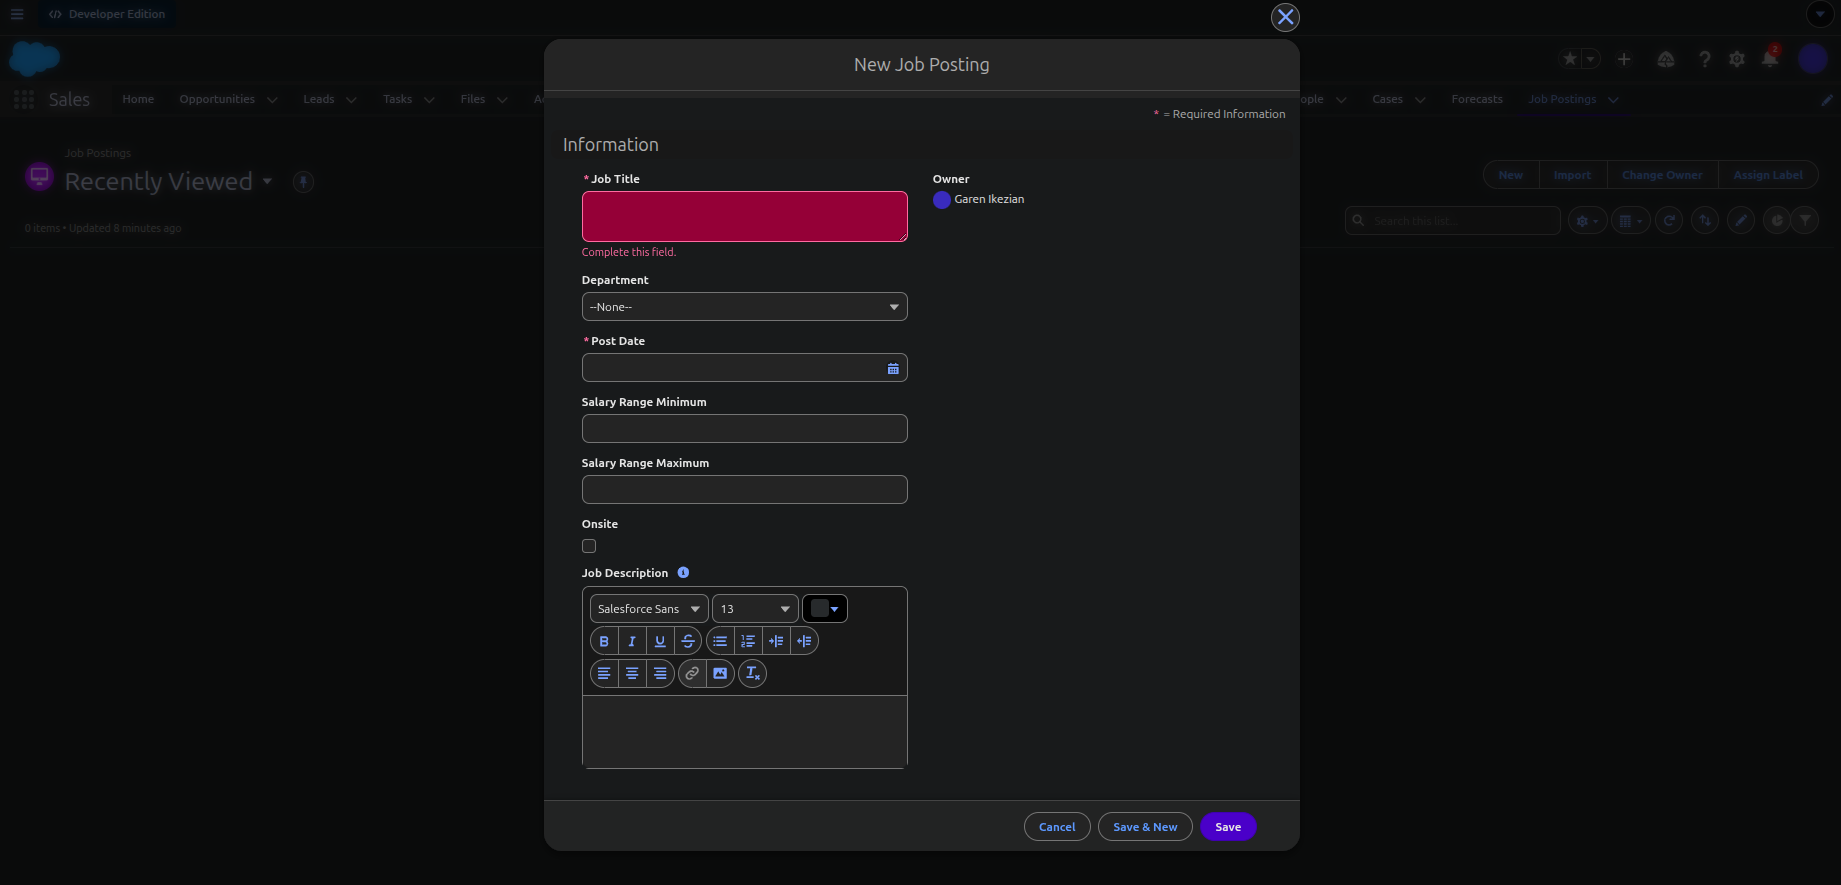
- Type in the Field Label "Job Title". This record is intended to be our actual title of the job post.
Note: Field Name is the API/server name of the field. Field Label is the front-end name of the field. It's good for both to have the same name.
- Click on "Always require a value..." then click "Next"
- If you're into adding more fields and saving this field, click "Save and Next". Otherwise, just click "Save".
You're free to add more objects. Try to create a scenario that looks like this:
Note: In case you added a field but it's not visible when you're trying to add a record, you have several options:
Best method: Go to Setup, type in "Session Settings" in Quick Find, disable "Enable and persistent browser caching to improve performance", go back to the home page, type ctrl+f5 to hard refresh then let it reload. This should make the new field visible. Do know that this cannot be disabled in production, only in sandbox.
Go to "Page Layouts", click on "Job Posting Layout", click "Save", then refresh the Salesforce home page (either a soft refresh ctrl+r, hard refresh ctrl+shift+r, or clear cache with ctrl+f5).
Remove the new field from the information section in the "Page Layouts" page, Save it, refresh the page/clear the cache, put the new field back again, then refresh it again.
If all else fails, just log out then log back in.
Relationships
In order to create relationships in Salesforce, we need to ensure the right attributes are selected for a particular field. The two attributes are:
External ID Attribute: This makes a field in your local org correspond to the same field in an external org.
For example, say we have two records and both have the field "email". If you try to modify the "email" field in your local org, the corresponding external "email" field will automatically be updated.
As of writing this article, one object can have a maximum of 25 external ID. This includes in account to fields with either or both unique attributes and External ID attributes. Basically, unique attributes + External ID >= 25 in one object.
Unique ID Attribute: By enabling this attribute, we force the field have unique entries (we can either make it case-sensitive or insensitive). This attribute is commonly checked alongside the External ID attribute in order to avoid duplicates records when querying and ensure consistency for both the external and the local objects.
there are three main types of relationships (summary of this and this):
- Lookup Relationship:
- Two linked objects can exist independently. They are loosely coupled.
- Can be self-joined (self-relationship): Can link an object with itself (except for the user object). For example, you can link a custom object "Bug" to itself to show how two different bugs are related to the same problem (identical to SQL's self join).
- Master-Detail Relationship:
- Two linked objects cannot exist independently. They are connected tightly.
- The child record inherits whatever security settings you chose for the parent record.
- Cannot be self-joined.
- External Relationship: An object that references another object outside the local Salesforce org. There are three variants:
-
External Lookup: Links a Salesforce object to a external object.
- Parent Object: External object
- Child Object: Salesforce standard, custom or external object.
- Parent Matching Key: External ID (a.k.a Foreign Key of the parent object)
-
Indirect Lookup: Similar to an External Lookup, but it's almost the opposite
- Parent Object: Salesforce standard or custom object
- Child Object: External object
- Parent Matching Key: ANY CUSTOM FIELD with both Unique and ExternalID attributes enabled.
-
Standard Lookup: Links an external child object to a Salesforce standard or custom parent object.
- Parent Object: Salesforce standard or custom object.
- Child Object: External object.
- Parent Matching Key: Salesforce record ID (a.k.a Primary Key of the parent object)
-
From the official source, you can find a table that summarizes the external relationship like so:
| Relationship | Allowed Child Objects | Allowed Parent Objects | Parent Field for Matching Records |
|---|---|---|---|
| Lookup | Standard, Custom, External | Standard, Custom | The 18-character Salesforce record ID |
| External lookup | Standard, Custom, External | External | The External ID standard field |
| Indirect lookup | External | Standard, Custom | A custom field with the External ID and Unique attributes |
We'll get into the External Relationship more later. But for now, it's good to mostly digest on the Lookup Relationship and the Mater-Detail Relationship.
All about List Views
List view is a Lightning Experience components that lets admins edit, create and delete records of an object. It's really no different from querying rows from a particular table with SQL.
We can create custom list views and add filters to narrow down our query.
To create a custom list view:
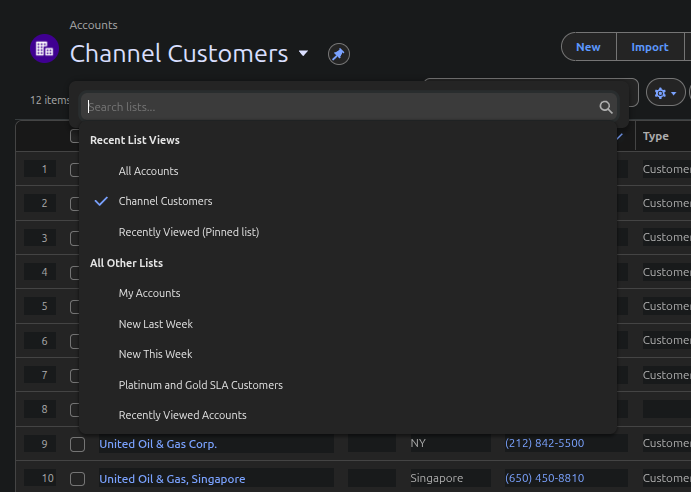
- Click on the App Launcher and type "Accounts" (or click on "Account" button on context bar, click "More" if you can't find it)
- Click on "Recently Viewed" then select "All Accounts" under "All Other Lists"
- You'll find all the accounts records in your org. Now in order to create a query to your liking, you need to create a list view. Click on the small gear icon beside "Search this list..." then click "New".
- Name the list "Channel Customers" under "List Name".
- Select "All users can see this view".
- Click Save.
You should now see this:
This helps us find the correct "snapshots" of our object instead of dealing with filters every time.
To add a filter:
- We click on the funnel icon beside the pie chart icon, then we can "Add Filter".
- I'll let you play around with this filter. It's quite intuitive from here.
Compact Layouts and Page Layouts
Compact Layouts
Compact layouts provide the first impressions of a record. When you click on a record in any object (say, "Opportunity"), we are initially greeted with the Opportunity Name, Account name, Close Date, Amount, and Opportunity Owner.
Note: Upon reading the documentations, you may stumble upon the words "Highlight Panel" and get confused. "Highlight panel" is what the user sees to access the compact layout fields. "Compact layout" is how we organize the fields in the highlight panel.
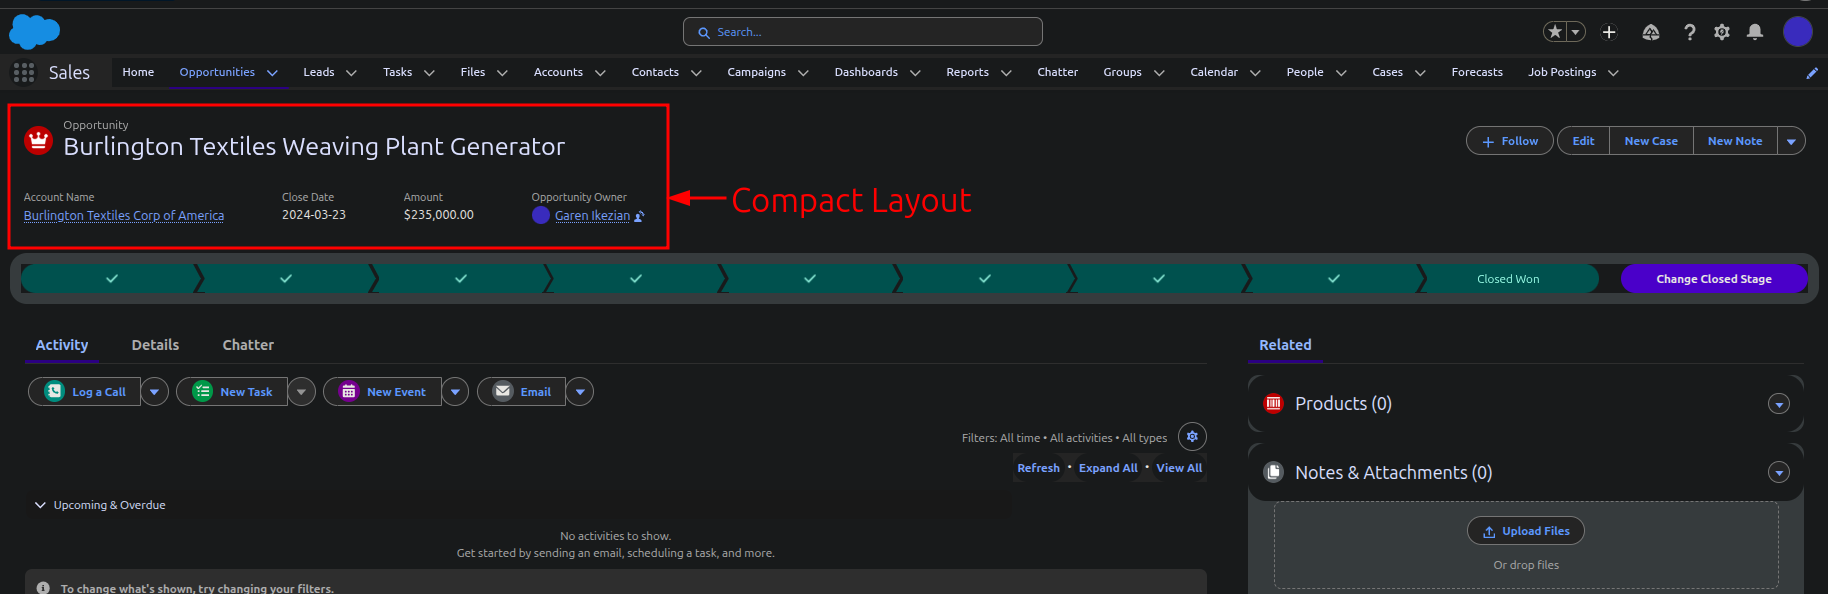
When you go to Setup --> Object Manager --> Opportunity --> Compact Layouts --> System Default, you'll see the fields match up:
Note: Ignore "Opportunity Score" as that's irrelevant to our case. This only applies to the Opportunity object. Read this link to understand the prerequisites. It's not important to digest that for now.

Now that we digested that, we find that the Contact compact layout looks like this:
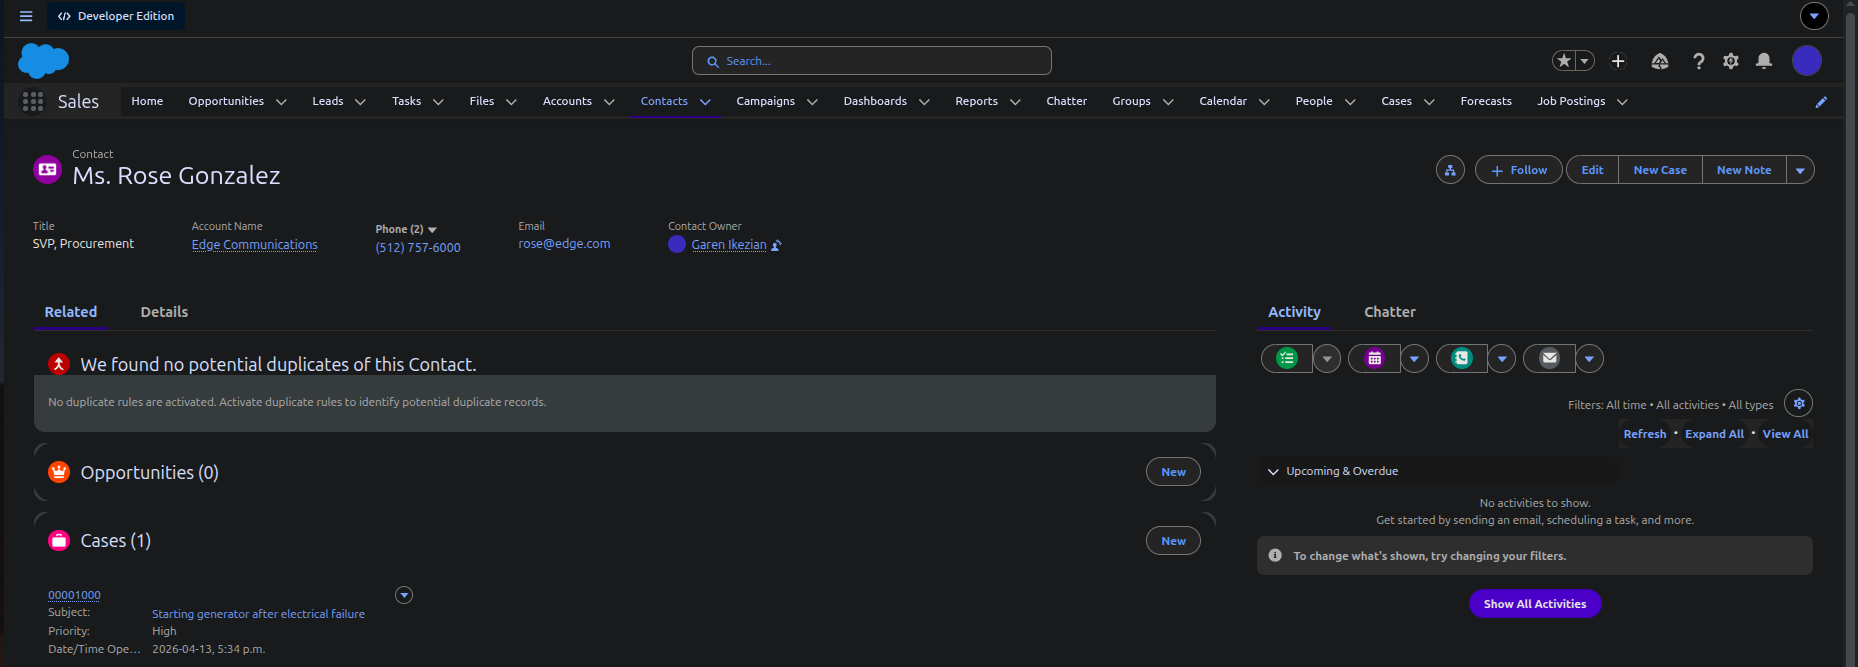
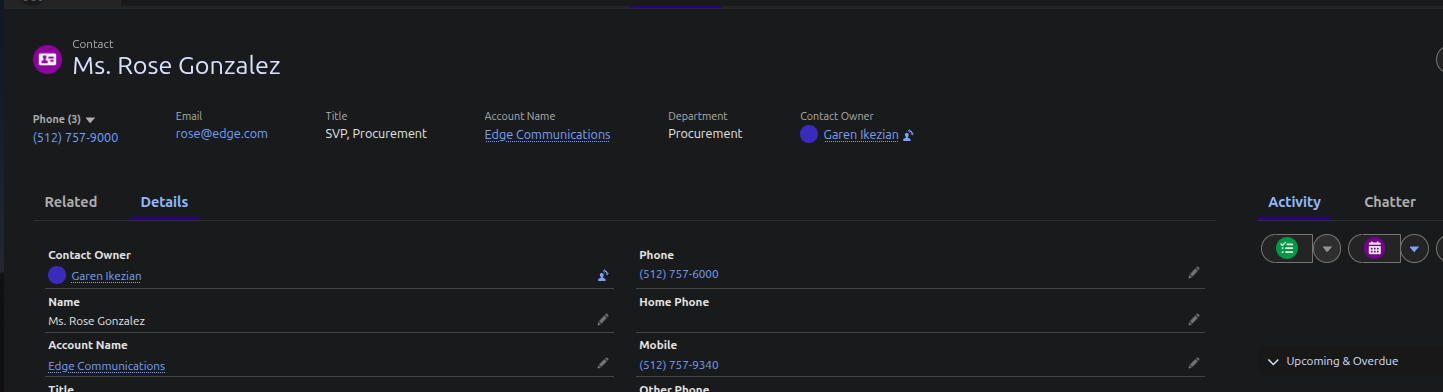
Let's say you just added the fax number under the details tab of Rose Gonzalez (1-888-473-2963) and your boss wants to see the fax number for every contact record in the Contact object, here's what you can do:
To find "Compact Layout" for a desired object in setup, there are two ways:
- "Setup" --> "Object Manager" --> "Contact" --> "Compact Layouts"
- When you select a record of an object you want to change, click "Setup" --> "Edit Page" --> Select the "Highlights Panel" (the first thing you can select in the page) --> At the right panel, scroll down to "view all layouts" under "Assign Compact Layouts".
You'll find the compact layout "System Default" has a checkmark. That is the one assigned to by default. You'll find two buttons at the top right.
- "New": Lets you make a new compact directory without cloning.
- "Compact Layout Assignment": Lets you assign the compact layout
In our case, to create one: 2. Click one "System Default" --> "Clone" 3. Type the Label "new primary" 4. Under Available Fields, add "Fax" to the right. Make sure it is right under Phone.
Notes:
- Always have the Name field at the top of the "Selected Fields" list as to provide context for every record the user clicks on.
- When a field is empty from the record, it will not appear in the compact layout until the field is written in the details tab.
- When there are multiple phone numbers (fax, phone, mobile), they become one field as a collapsible button (See link). The first phone-related field in the "Selected Fields" list will determine the order of your phone numbers field.
- In Lightning Experience (the browser version), the maximum number of fields that you can add in the compact layout are seven and may vary based on the width of the screen, which record page is being viewed, and the permissions of the user. In Salesforce Mobile app, it is ten fields.
- Save
- Click "Compact Layout Assignment" --> "Edit Assignment"
- Set "Primary Compact Layout" to "new primary" --> Save
Try playing around to get this:
Page Layout
There are two types of software to change the page layout of a record page, Lightning App Builder and Page Layout Editor.
This is Lightning App Builder:
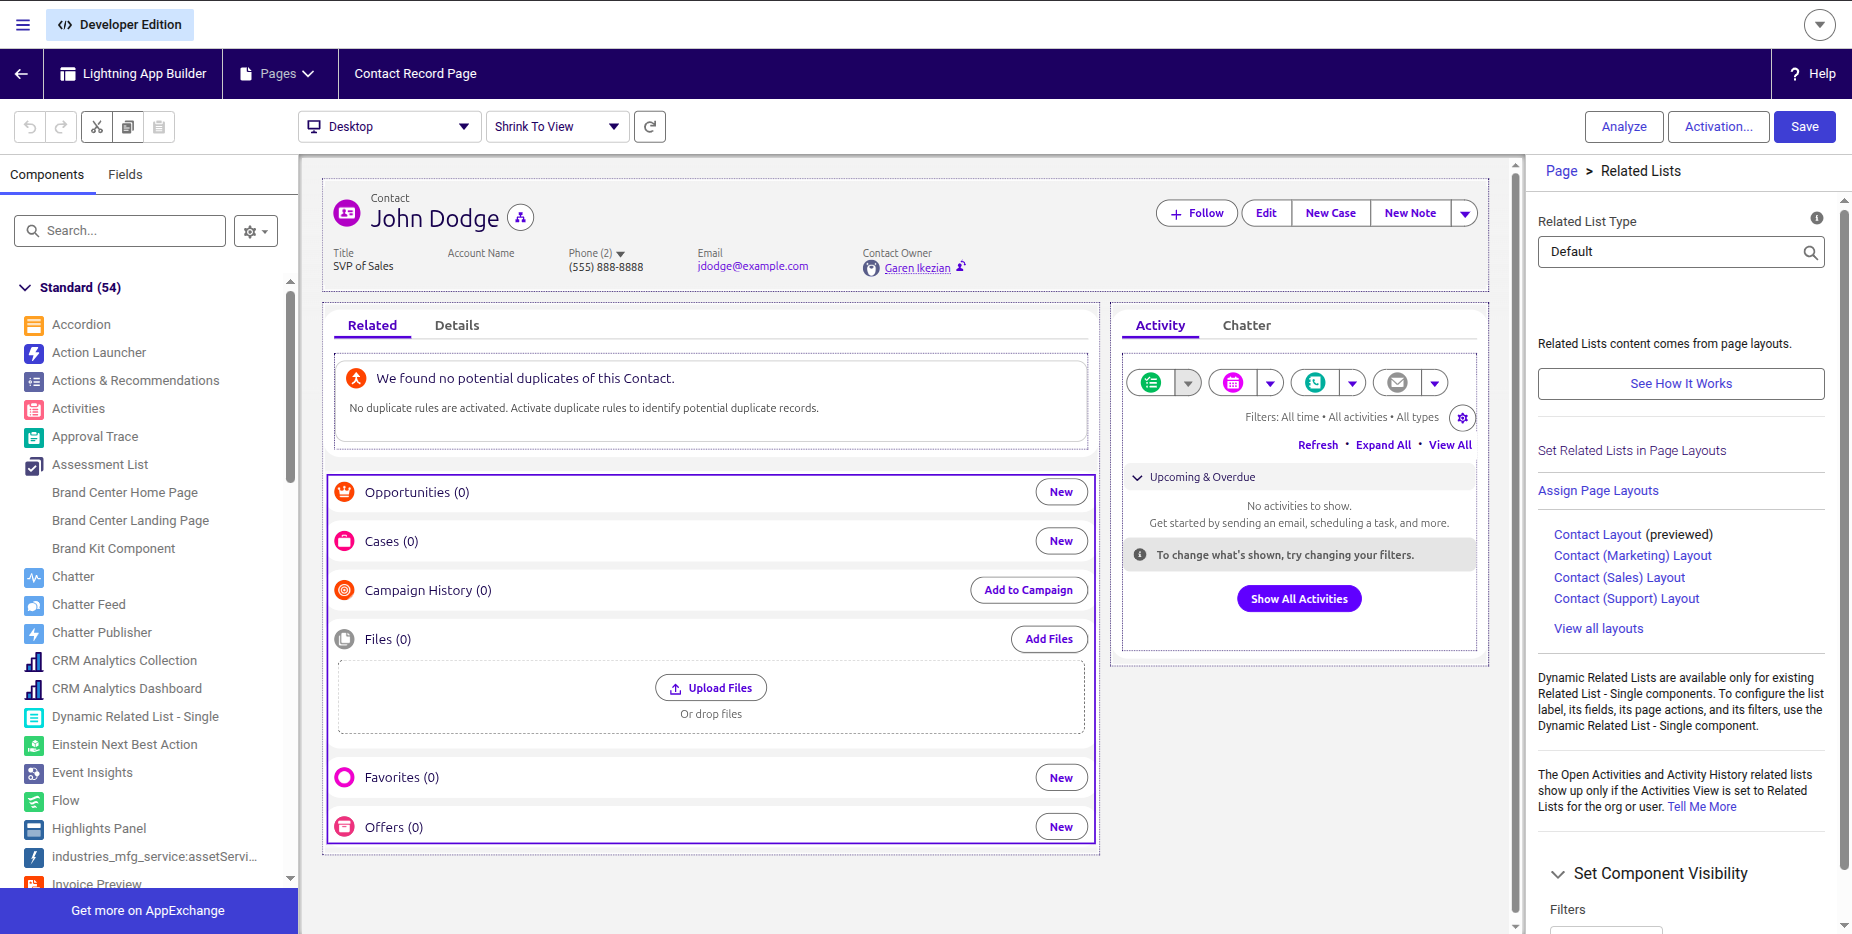
Lightning App Builder: The front-end side that lets you customize your page record UI and allows you to activate these changes live.
When you want to organize the fields under the details tab or have different ordering for the action buttons, you need to enable the Dynamic Actions.
Note: When you enable dynamic actions in the Lightning App Builder, highlights panel actions for the record page no longer come from the object’s page layout.
There are four types of activations:
- Org: Make your page layout the org default for the object (all Lightning apps' with the same object will show the same page layout).
- App Default: Make your page layout the default object record page for specific Lightning apps.
- App, Record Type and Profile:
- Assign the page to a combination of Lightning apps, record types, and profiles.
- Assign the page to a form factor, such as a desktop or phone.
This is Page Layout Editor:
Page Layout Editor: The backend-side that controls which fields, custom links, and actions users have access to.
As you can see, you may notice the names "Fields", "Buttons", "Quick Actions" etc. All these allow you to drag and drop under a desired tab or section of the record page.
Very much like compact layout, you can assign your custom page layout to your record page.
Note: Any changes made to the "Page Layout" editor in Setup will not be affected until it is updated/activated and saved in the Lightning App Builder.
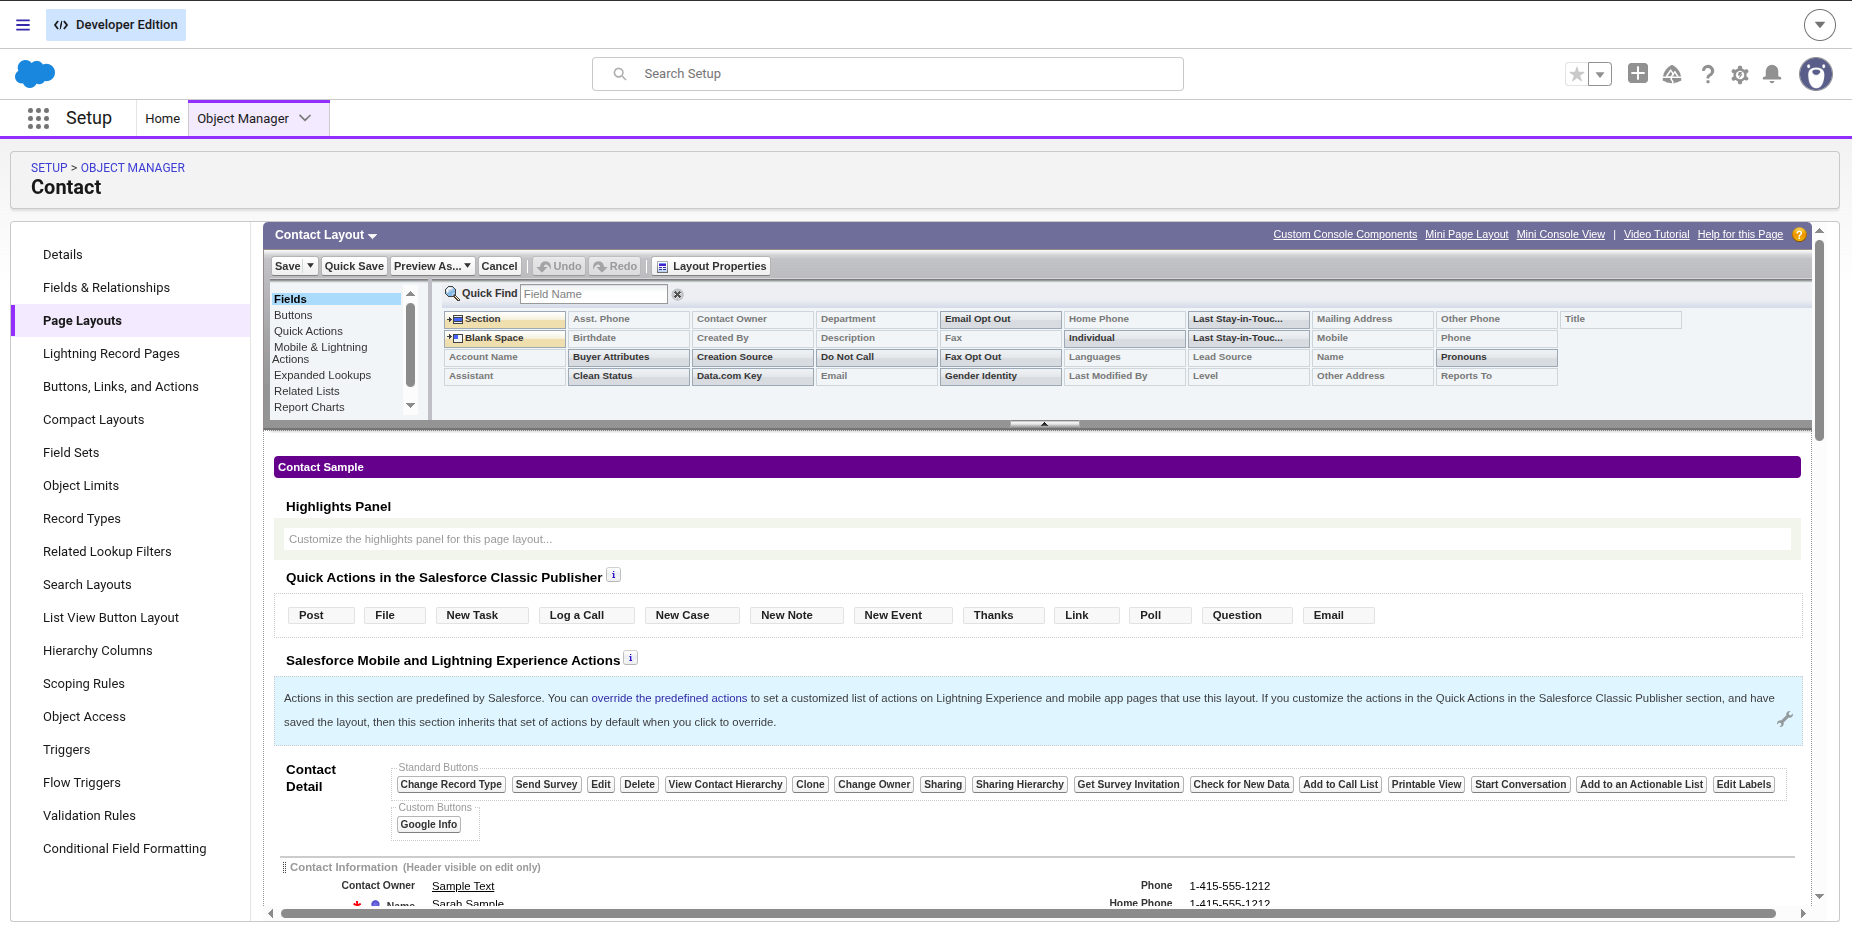
This is how the detail fields correspond to each other from a Contact record page to the page layout editor:
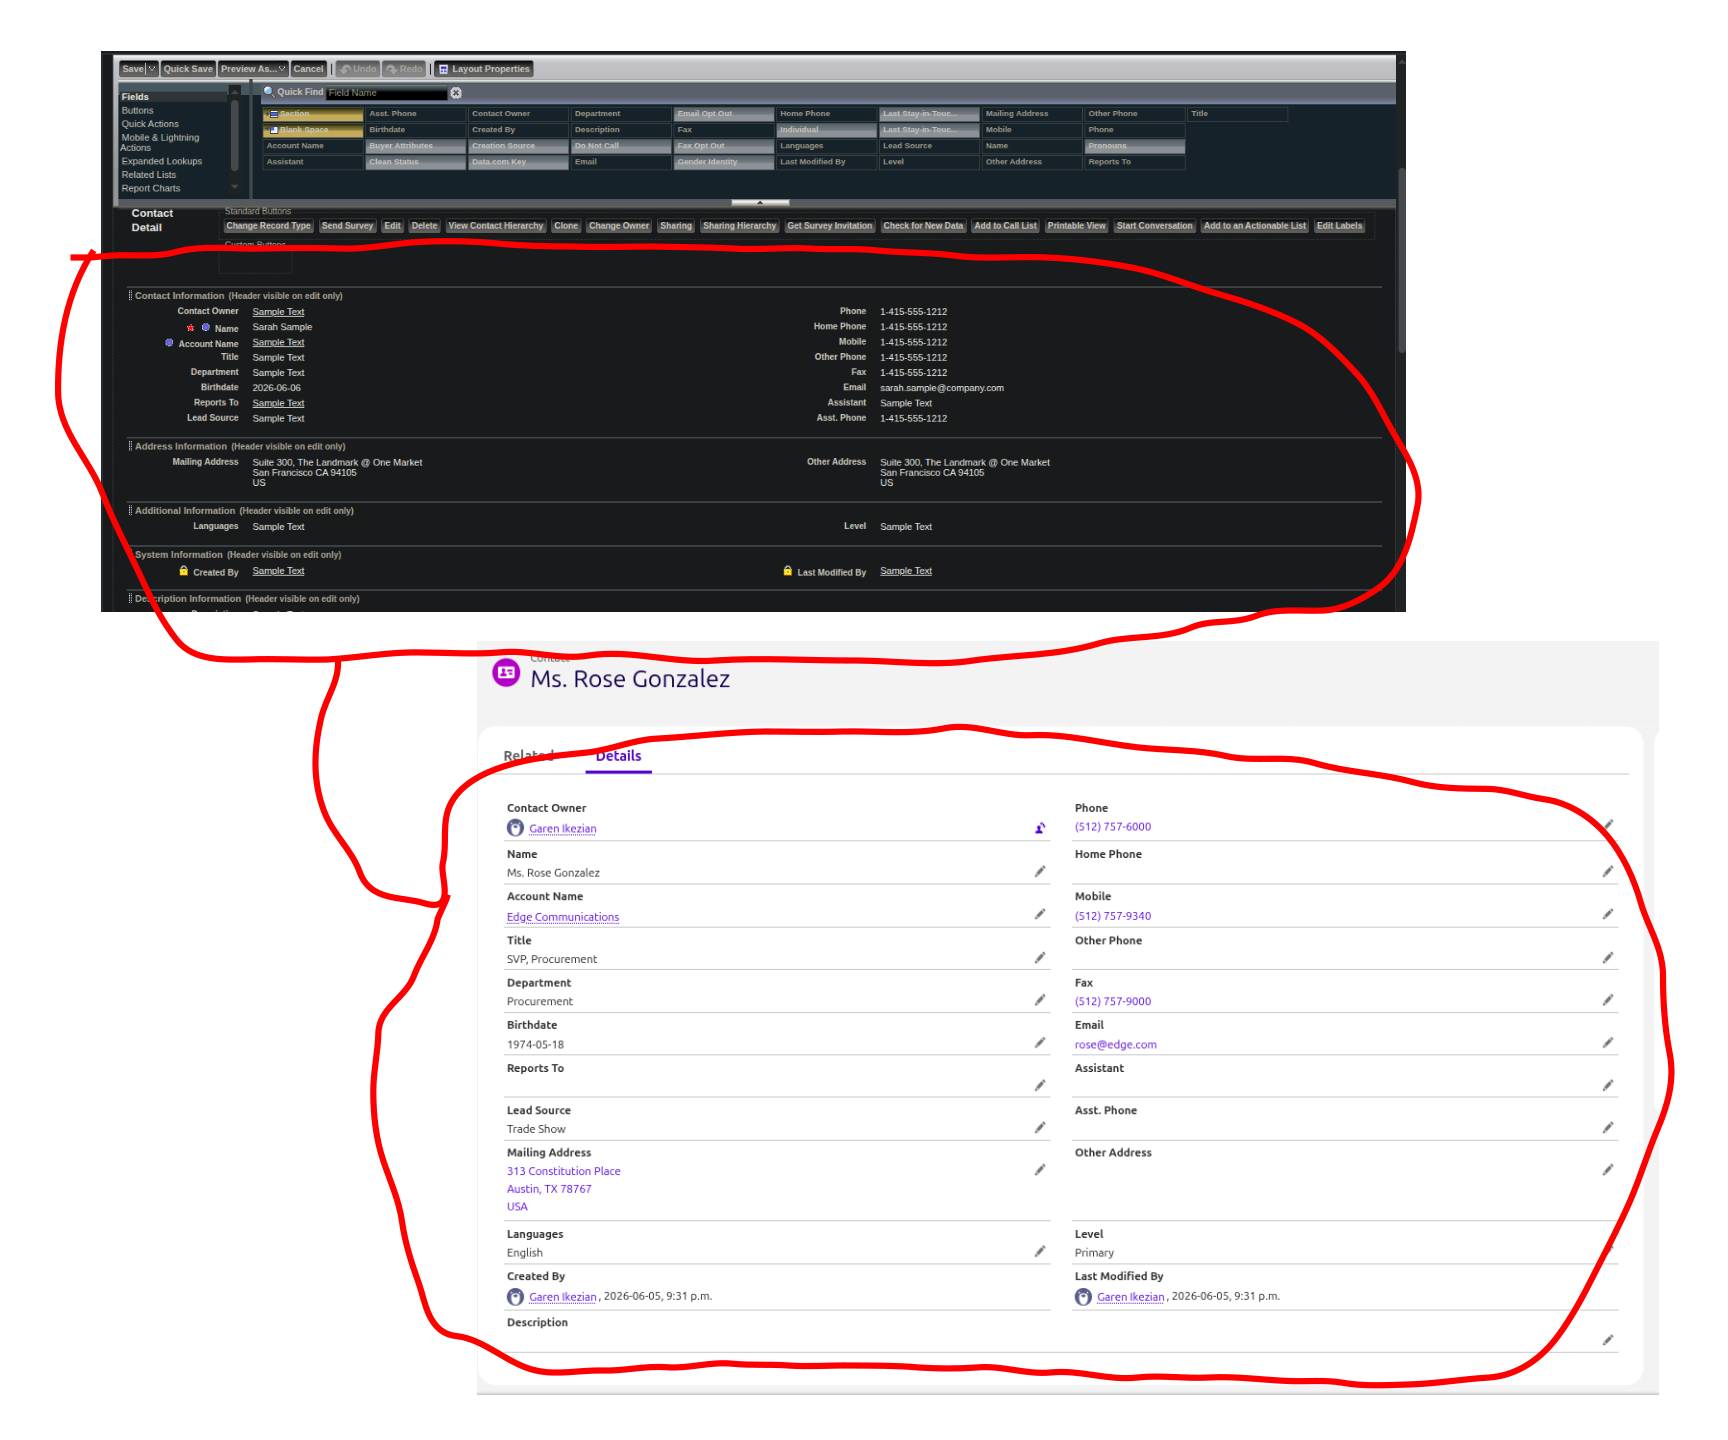
Meanwhile, "Salesforce Classic Publisher", "Salesforce Mobile and Lightning Experience Actions", and Object name Detail all correspond to the Buttons, Quick Actions, and Mobile and Lightning Actions located on the right panel tabs respectively.
I have separated the "Chatter" and "Activity" tabs in Lightning App Builder to see the correspondance better:
As for Related Lists, it's at the very end of the page layout editor corresponding to the Related tab (some fields require data "Acitivity History" for visibility):

To understand "Quick Actions in the Salesforce Classic Publisher" and "Salesforce Mobile and Lightning Experience Actions", salesforce initially ran with the Classic Publisher (legacy UI) and all the buttons/actions were in one location. As soon as Lightning Experience became the standard, developers had to adjust and tune a new UI for people who sill prefer to run alongside legacy UI.
This doc explains how they work together:
If you haven’t customized the Salesforce Mobile and Lightning Experience Actions section of a page layout, the actions for that object default to a set of predefined actions (link).
If you have customized actions in the Quick Actions in the Salesforce Classic Publisher section, and have saved the layout, the Salesforce Mobile and Lightning Experience Actions section inherits the actions from the Quick Actions in the Salesforce Classic Publisher section, plus any standard or custom buttons present on the layout, when you click to override.
Basically...
Classic Publisher Quick Actions empty? --> Inherits from the global page layout (It inherits from User Interface --> Global Actions --> Publisher layouts --> Click Edit for "Global Layout").
Mobile and Lightning Actions empty? --> Inherits Classic Publisher Quick Actions + predefined actions depending on the object.
Because some objects do not have a lot of data in a Trailhead sandbox, not all Classic Quick Actions and Lightning actions are gonna be visible. This is not something you need to worry about at this time. For example, I had to figure out why "Change Record Type" action was not visible in a Contact record only to find that the Contact object did not have any record types to begin with (Object Manager --> Contact --> Record Types).
As long as you stick with Lightning mode and not Classic, you'll have a peace of mind. Everything will be done based on Lightning's rules (including Classic Quick Actions).
Also a good rule of thumb is that it's better to rely on frequent changes using the Lightning App Builder; so only use the Page Layout editor if necessary.
Actions
Note: There is this doc if you're interested in more reading.
We just touched a little bit about Actions but now we're gonna dive slightly deeper.
Actions are the doers of an Object. They are like REST API's POST, DELETE, PUT requests (unlike standard Buttons or Links which only do GET requests).
Like Page Layouts, there are Action layouts. These layouts also have fields on them. Some actions have a window popup called "Screen Quick Action", others only run background tasks with a click of a button (e.g. Headless quick action).
For example, let's say you select button "New Contact". It pops up a new window of the fields you want to input (Contact Name, Status, Subject, Description).
There are two main types:
Global Actions:
- They can used on chatters, feed page, groups page, global publisher etc. They can be put anywhere where actions are supported.
- They enable users to create object records, but they are never associated to other objects. In other words, one to many, one to one, many to many relationships do not apply with global actions.
Object-specific Actions:
- They are only created in the context of a particular object.
- Unlike global actions, one to many, one to many, one to one, many to many relationships allk apply.
- To create one, select a desired object in Object Manager, then select "Buttons, Links, and Actions""
Actions are further subdivided intro various types.
We will get into them soon.