Excel Cheat Sheet
This article highlights the basic use of Excel and its keyboard shortcuts. It's a great reference for anyone looking to streamline their work in Excel.
Basic Shortcuts
To Navigate:
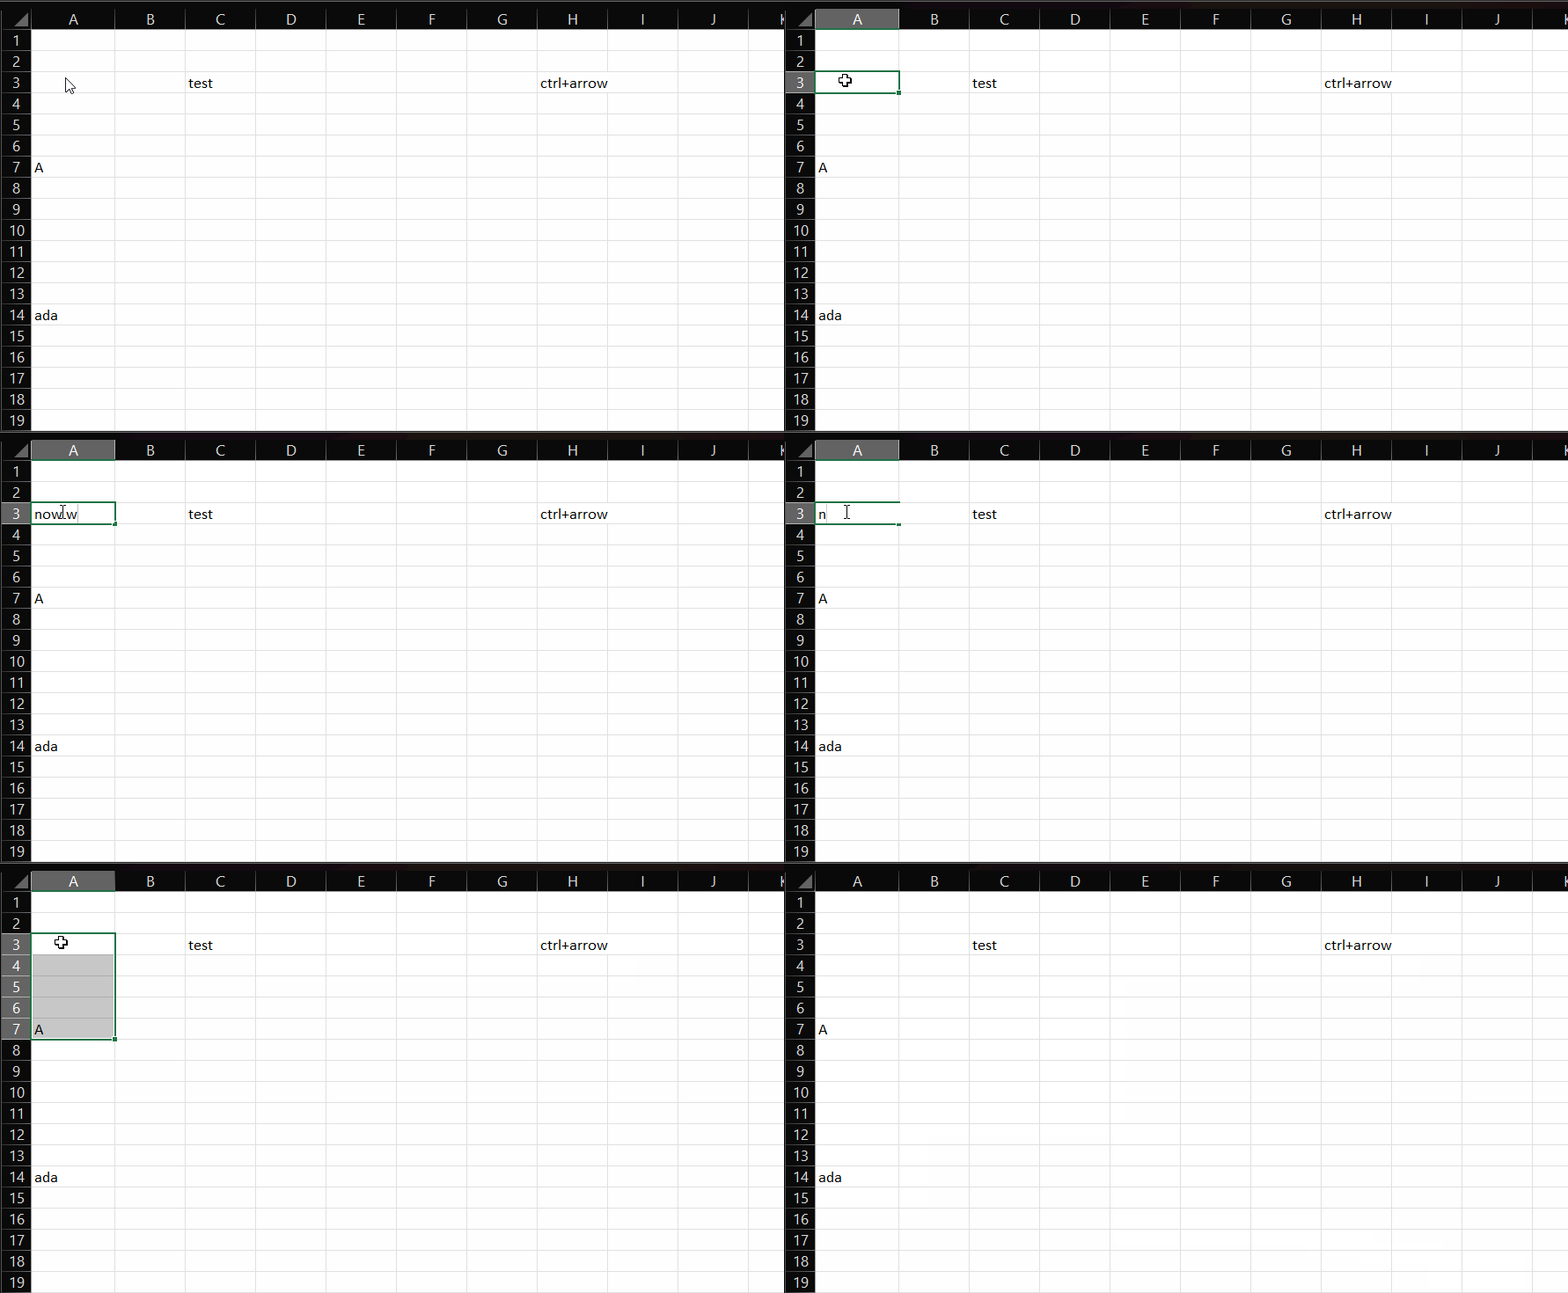
We can either use the arrow keys OR:
Tab: Move rightShift+Tab: Move leftEnter: Move downShift+Enter: Move up
Selecting
- Hold
Shiftthen type arrow keys to select the cells you want to focus on (note the green border).
- To do something to a particular cell in your selected cells, you can type
enteror holdshiftthen typeenterto select then change the value of a particular cell.
- To do something to a particular cell in your selected cells, you can type
Ctrl+arow: Selects the next cell at the start and end of each range separated by empty rows or columns (like selecting the next "paragraph" if you will).Ctrl+Shift+arrow: Like the shortcut above, but it also selects all the cells (not one particular cell).

ctrl+space: Selects the entire column.shift+space: Selects the entire row.
Others
F1: Opens helpCtrl+z: UndoCtrl+y: RedoShift+F10: Right clickCtrl+Home: Returns to A1 (the very first cell/origin)Ctrl+Alt+Plus: Zooms inCtrl+Alt+Minus: Zooms outF2: The cursor shows up in the selected cell. The cell is not cleared when there is data in that cell. (unlikeEnter).Alt: Shows all the options in the ribbon menuCtrl+;: Fill the cell with the current dateCtrl+Shift+;: Fill the cell the current time
Some Jargons/Stuff to Know
- Workbook: The Excel file
- Worksheet: The tabs in the workbook
- Ribbon: The thing the user sees at the top of the window
To insert a column, a row, or a cell...
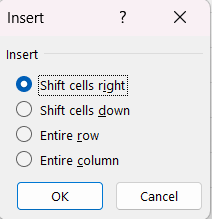
When you right click a cell, you have the "insert" opetion. If you click it, It will show this:

A shortcut to do this is to type Ctrl+Shift+. It will pop up the same window.
You get to shift cells in the same row to the right or down.
You can also insert an entire row (it will insert a row above the current selected cell with the green border)...
Or you can insert a whole new column to the left of the current selected cell. It will push all cells to the right.
Understanding How Columns Work in Excel
Notice how the rows are numerical while the columns are alphabetical. The columns' labels follow a hexavigesimal pattern (note that 0 is not inclusive since Excel's columns are offset by 1):
| Decimal | Hexavigesimal |
|---|---|
| 1 | A |
| 2 | B |
| 3 | C |
| ... | ... |
| 25 | Y |
| 26 | Z |
| 27 | AA |
| 28 | AB |
| ... | ... |
| 701 | ZZ |
| 702 | AAA |
| 703 | AAB |
| ... | ... |
| 16,383 | XFC |
| 16,384 | XFD |
The range of the of the rows is [1, 1,048,576] while the range of the columns is [A, XFD]
We combine these labels to form the names of the cells. As we may well know, the first cell in the upper left corner is called A1 (note the Name Box right below the clipboard).
With that out of the way, we can now write equations to the cell.
Writing Equations
To write an equation, we use the equals sign to prompt Excel to use the SUM function.
Excel uses the SUM function by default unless otherwise specified.
Excel is smart enough to know if it is dealing with dates or numbers.
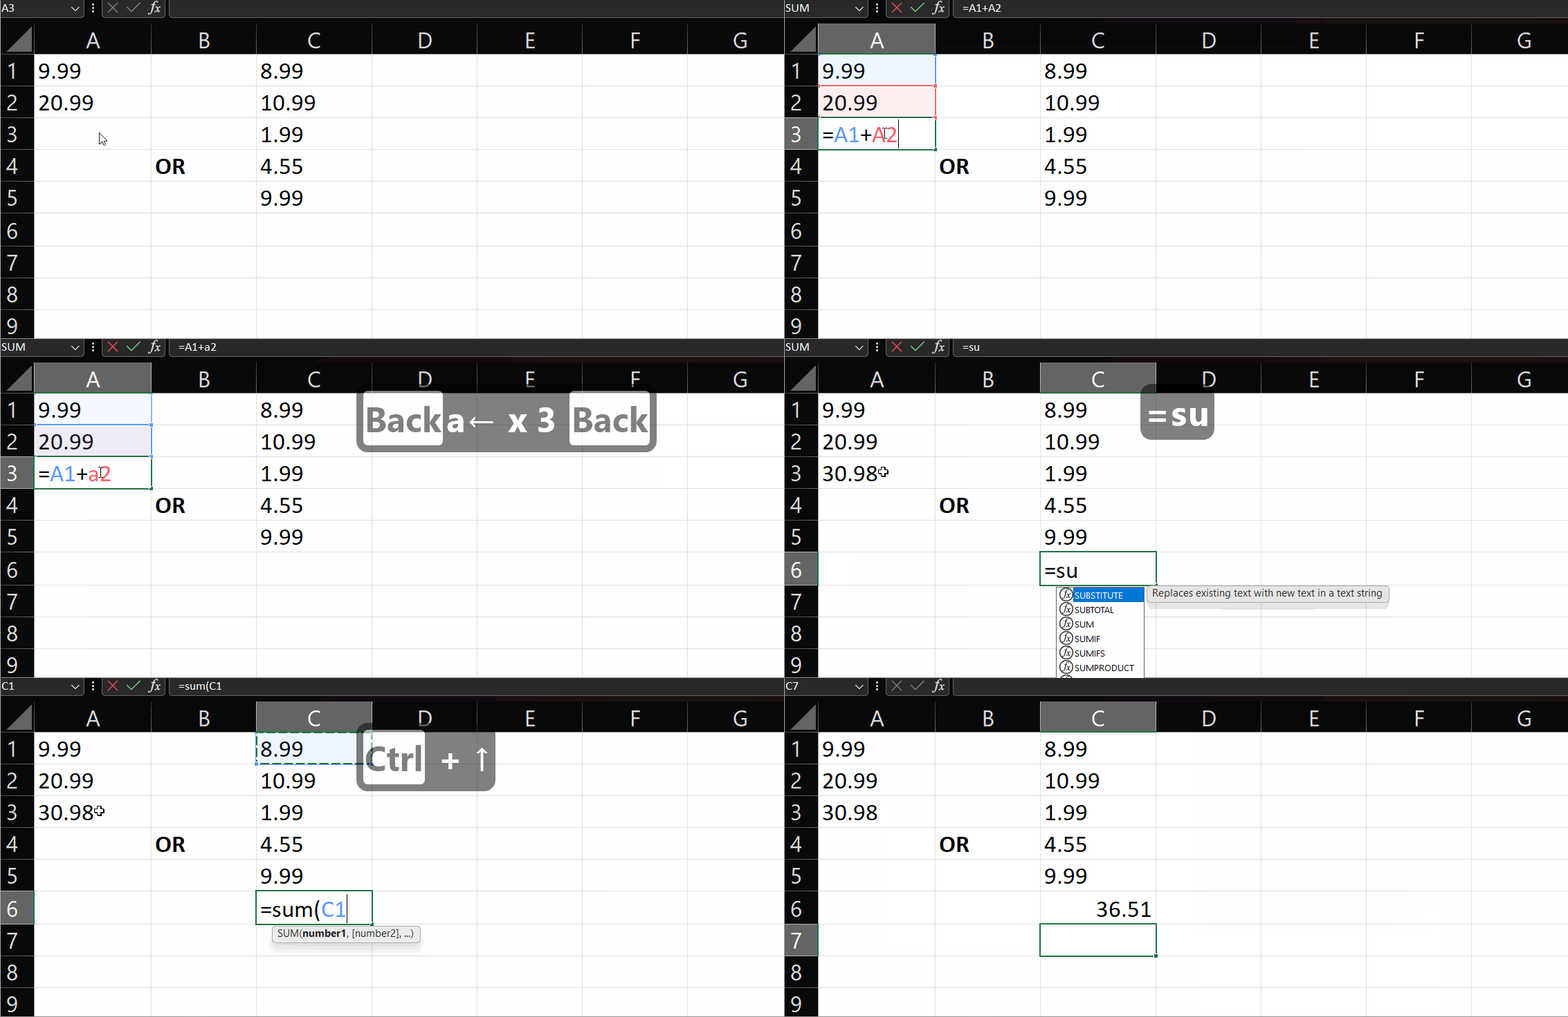
If we have two numbers in A1 and A2, we can type = and the names of those cells with the plus sign in between. It is case-insensitive.
=A1+A2 or =a1+a2
Or we can type the SUM function itself. Its only purpose to add numbers in a range of cells.
With SUM, we can include a range of cells
like C1:C5 inside its argument. It is a much neater way to add numbers instead of specifying their names one by one ("=A1+A2+A3+...").
To demonstrate:

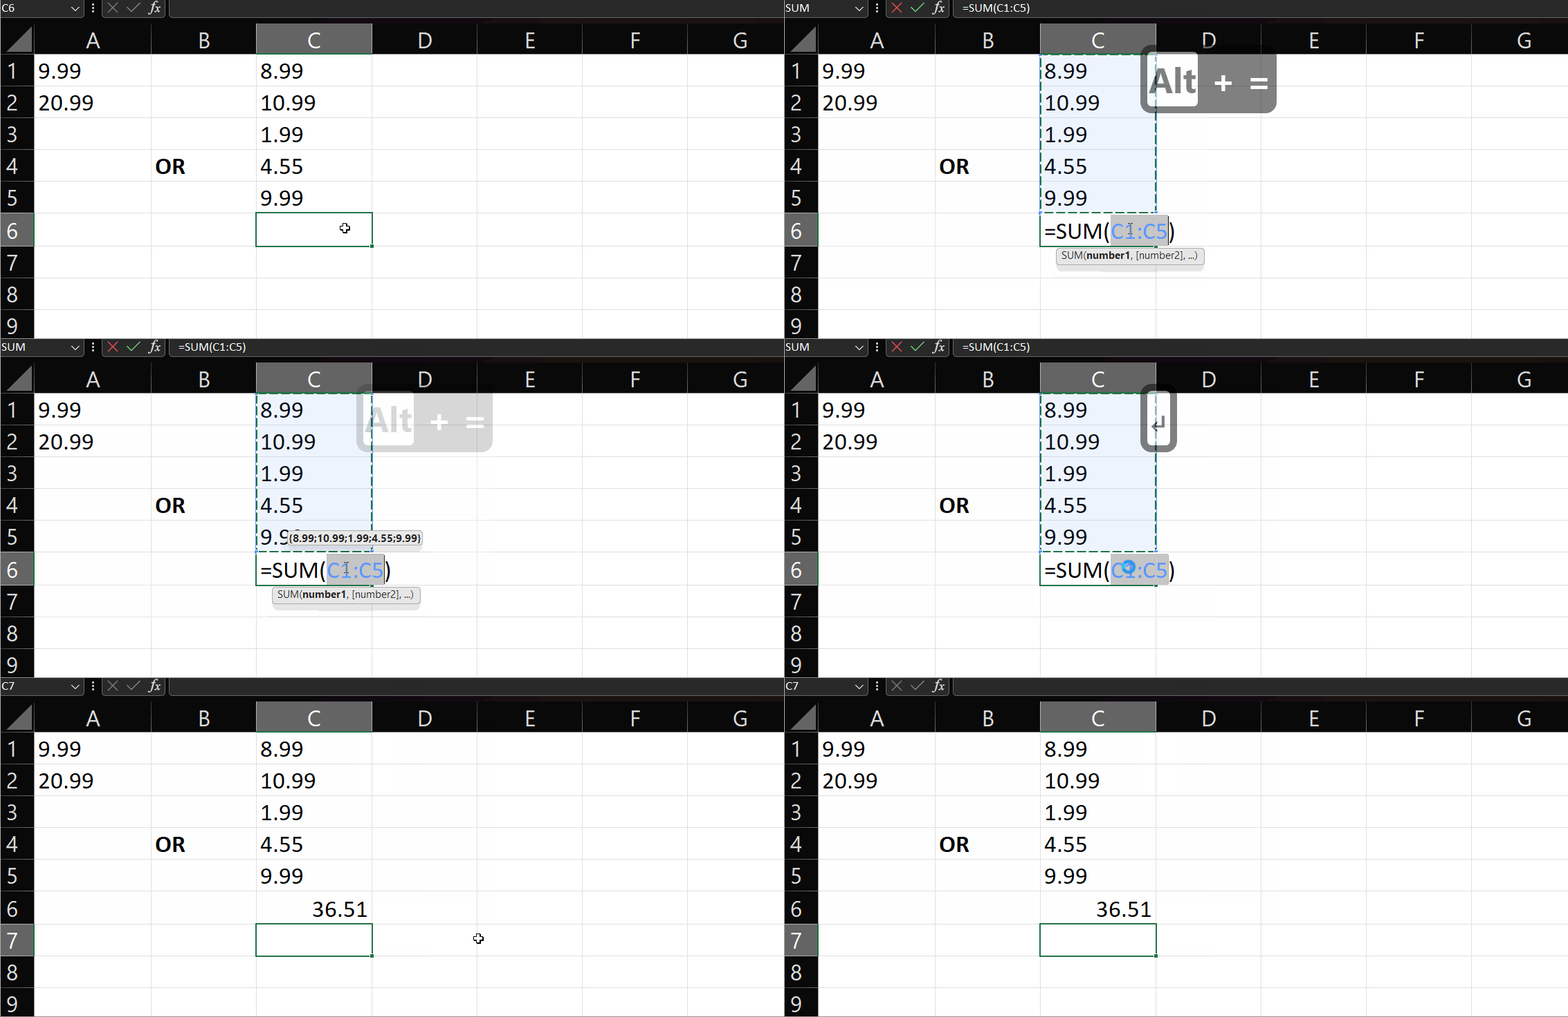
Another way to add the numbers in a column is by holding alt and
typing + together. Excel is smart enough to show a desired equation:

Excel supports +, -, *, /, (), and ^.